AI Image
Say what you want changed. The photo changes.
Upload the picture you already have — a phone snapshot, an old product shot, a screenshot — and describe the edit in a sentence. The editor rebuilds only what you asked for and leaves the rest of the image alone.
What is the AI Image Editor?
Most photo problems are small and specific: a distracting background, a cable in the frame, a shot that is portrait when you need landscape, light that flattens the product. Fixing them used to mean a designer or an hour in an editor learning selections and layers.
The AI Image Editor works from instructions. You upload the image, type the change — "put this on a clean beige studio backdrop", "remove the person in the background", "extend this to 16:9" — and it regenerates only the affected area, matching the existing perspective, grain and colour.
Because every edit is reversible and stackable, you can work in small steps: clean the background, then relight, then extend, then upscale for print. Each version is kept, so you can go back to any point.
Capabilities
What you can do with the AI Image Editor
How it works
Using the AI Image Editor
- 01
Upload the original
Any photo you own — phone shot, catalogue image, screenshot. Higher-resolution originals give cleaner edits.
- 02
Describe the change
One instruction at a time, in plain words. Be specific about what should stay the same as well as what should change.
- 03
Refine or stack
Keep the version you like and run the next edit on top of it. Background, then light, then crop, then upscale.
- 04
Export at the size you need
Download for web, social or print, or push the result straight into an ad, a product page or a video.
Examples
What good input and output look like
AI Image Editor
Live demoWriting the prompt1/2You upload + type
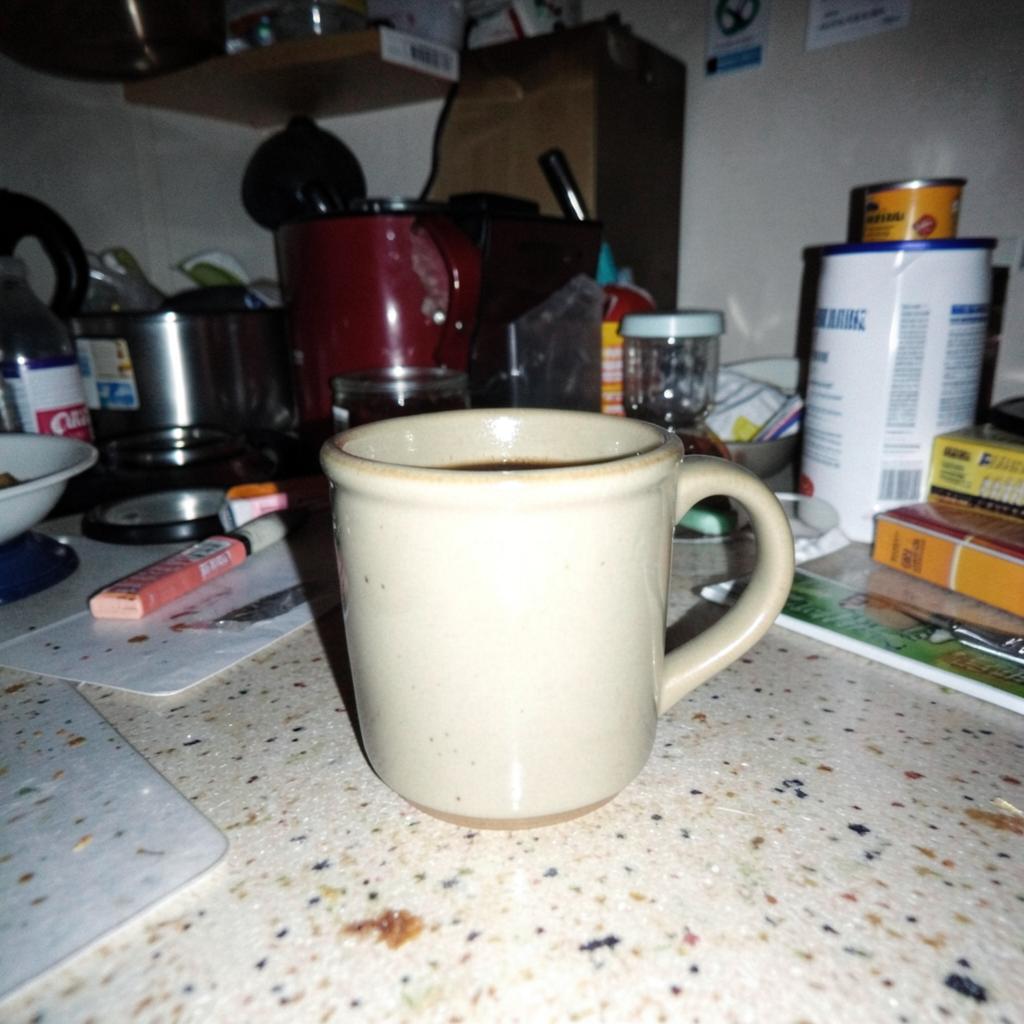 Source image attachedUploaded phone photo: a ceramic mug on a cluttered kitchen counter
AmmarAI renders
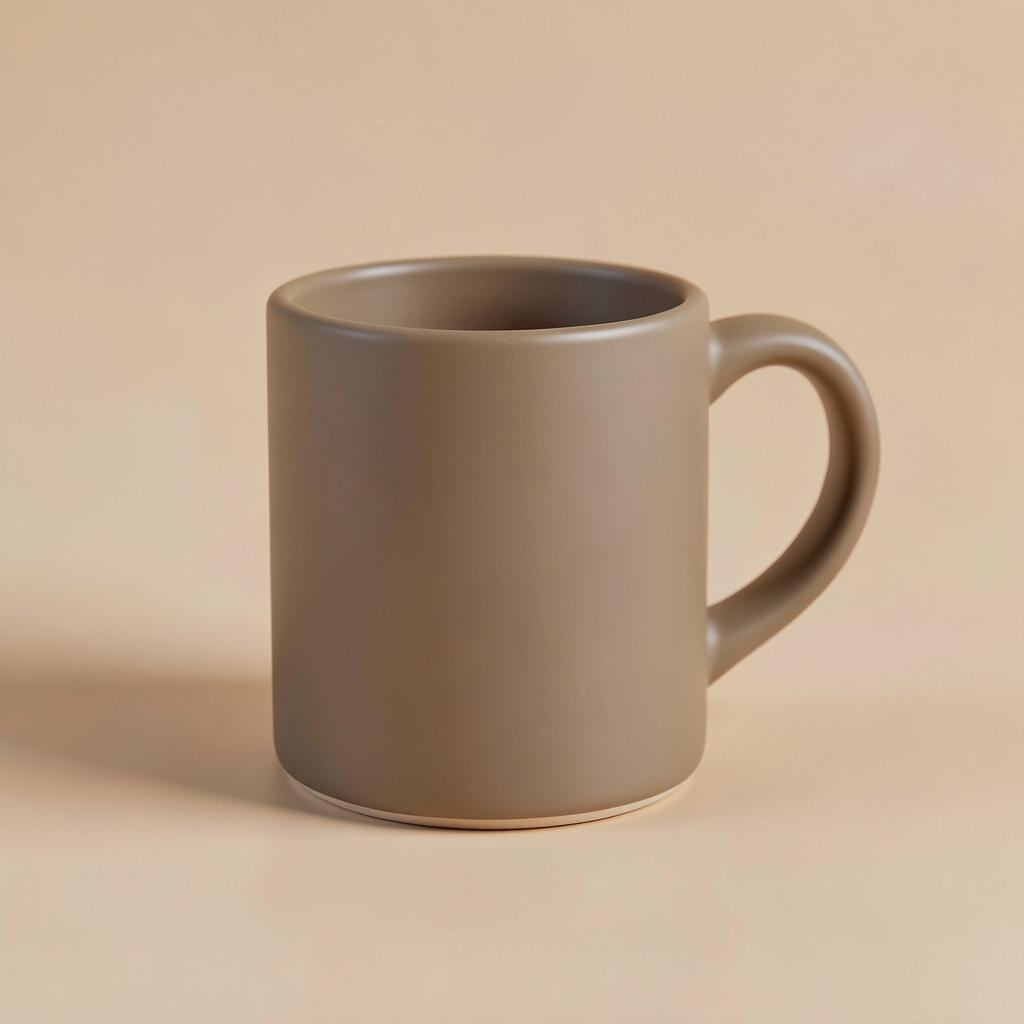
Sample edit — same mug, moved onto a clean beige studio backdrop with soft light and a natural shadow.
The mug is kept exactly as photographed — same shape, glaze and highlights — on a seamless beige sweep with a soft shadow, ready to drop onto a product page.
Kitchen snapshot to catalogue shot
Input
Phone photo of a ceramic mug on a cluttered counter. Instruction: "Put it on a clean warm beige studio backdrop with soft directional light and a natural shadow."
Output
The mug is kept exactly as photographed — same shape, glaze and highlights — on a seamless beige sweep with a soft shadow, ready to drop onto a product page.
Reframe for a banner
Input
A 4:5 portrait lifestyle image that needs to run as a 16:9 website header. Instruction: "Extend the frame left and right, keep the subject centred, leave empty space for a headline."
Output
A widened scene with invented but consistent surroundings, the original subject untouched, and clean negative space on the right for text.
Key features
What the tool gives you
Instruction-based editing
No masks, no layers, no selection tools. Describe the change and the model works out which pixels it affects.
Object removal that fills correctly
Deleted objects are replaced with plausible background, matched for perspective, texture and lighting.
Generative frame extension
Turn any crop into any ratio by inventing the surrounding scene rather than stretching or letterboxing.
Relight and recolour
Change the mood of a shot or produce a full set of colourways from a single photograph.
Upscaling with real detail
Push a small web image up to print size, reconstructing edges and texture instead of blurring them.
Batch edits
Apply one instruction across a folder — the same clean backdrop on 80 product photos in one pass.
Who it is for
People who get the most from this
Online stores
Turn supplier photos and phone snapshots into a consistent catalogue without a studio.
Marketers
Reframe one hero image into every placement size a campaign needs.
Small businesses
Fix the photos you already have instead of paying for a reshoot.
Content creators
Clean backgrounds, remove distractions and keep a consistent look across a feed.
Workflows
Practical ways teams use it
Consistent product catalogue
Every item on the same backdrop with the same light, whether it was shot by you, a supplier or a phone.
One shoot, every placement
Extend and recrop a single hero image into square, story, banner and print versions without losing the subject.
Cleanup before publishing
Remove the stray hand, the plug socket, the competitor's logo — the things that make a good photo unusable.
Tips that improve results
- Say what must stay unchanged, not only what to change — it keeps the subject faithful.
- Work in single steps and save each version; stacked edits beat one giant instruction.
- Start from the highest-resolution original you have, then upscale at the end.
- For colourways, name the exact colour and finish ("matte sage green"), not just "green".
Mistakes worth avoiding
- Asking for five changes in one sentence and getting none of them right.
- Editing a heavily compressed thumbnail and expecting print quality out.
- Removing something central to the composition and leaving nothing for the model to rebuild from.
- Using edits to misrepresent a product — the returns cost more than the shoot you saved.
AI Image Editor FAQ
Does it change the whole photo?
No. It regenerates the area your instruction affects and preserves the rest, matching grain, perspective and colour at the seam.
Can it keep my product exactly as it is?
Yes — that is the normal mode for background swaps and relighting. Say explicitly that the product must remain unchanged.
What resolution can I export?
Standard exports cover web and social; the upscaler takes the final image up to print resolution.
Can I edit many images at once?
Yes. Batch mode applies the same instruction to a folder, which is how most catalogues get cleaned up.
Related
Tools that pair well with this
AI Image Pro
A full image studio: generate from text, edit with a brush, keep one character or style consistent, swap backgrounds, upscale and export every size you need.
AI ImageAI Product Photoshoot
Turn one plain product photo into a full commercial shoot — studio, lifestyle and seasonal scenes.
AI ImageAI Creative Suite
One brief, a whole set of on-brand visuals — logo marks, ads, social tiles, packaging and banners that match.
AI ImageAI Fashion Try-On
Put a garment on a model without a shoot — same clothes, real fit, any model, any setting.
AI VideoAI Image to Video
Animate a still image into a short clip with camera movement and controlled motion.
Try the AI Image Editor free
One AI for everything you create. Start on the free plan and upgrade only when the volume demands it.